In early spring I start to get super excited for gardening season. I can hardly wait to get out there and plant all the tasty food I use to feed my family. I spend the springtime prepping and planting the garden, then I tend it throughout the summer months. There is nothing better than going out to your yard and picking fresh produce for a meal. Once the gardening season is over, I take to the woods with my other half and do some hunting. We like to get enough to fill our deep freezer and keep us fed through the year. After each season wraps up, you begin the final stages of preserving your food. It has always been a question of what the better method is: canning or freezing. I've learned that it's mostly personal preference regarding the flavor or texture you are hoping to achieve, and the length of time you are wanting to preserve. I'm going to go over the basics of preserving your food and some friendly tips and tricks that I have learned over the years
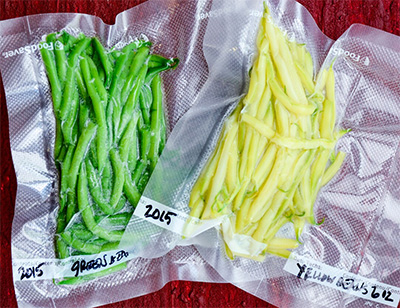
Freezing food slows decomposition by turning residual moisture into ice, inhibiting the growth of most bacterial species. This is the best method to use if you want to preserve the quality and texture of the food. While you can freeze just about anything, we will stick to the veggie, fruit, and meat side of things. Frozen fruits and vegetables will maintain high quality for 8 to 12 months, while frozen meat will last up to a year. Before you freeze many of the vegetables from your garden, you will want to blanch them. Blanching is the process of putting your vegetables in boiling water for a short period of time, and then immediately putting them in ice water to stop the cooking process. This technique helps vegetables keep their vibrant colors and retain nutrients. It also stops the enzymes that would lead to spoilage. The top vegetables you will want to be sure to blanch are beans, carrots, asparagus, peas, broccoli, cauliflower, and brussels sprouts. Other vegetables such as corn, tomatoes, potatoes, squash, and leafy greens won't need to be blanched.
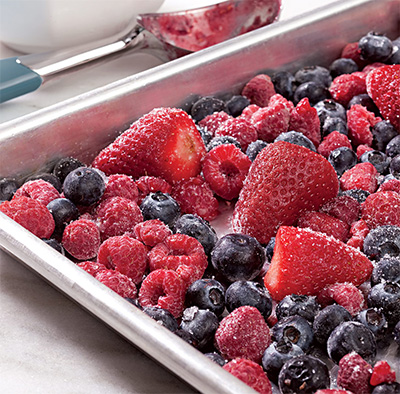
Fruits will also not need to be blanched prior to freezing. When freezing berries, I like to lay them out on a sheet pan and throw them in the deep freezer. This way they freeze separately and then I can throw them in a freezer bag later. This allows me to take out exactly what I need for whatever recipe I make that day and to avoid hard-to-break-up clumps. When freezing fruits or vegetables, I always have my vacuum sealer handy. It protects the produce from getting freezer burn and helps save on space. When I freeze meat, I choose to use freezer paper. I do this because this is how I was taught growing up, but if you want to use a vacuum sealer, that is perfectly fine as well. When freezing your meat, you want to cut it into the portions you will use for a meal. When wrapping I like to use a big piece of freezer wrap and then place the meat close to a corner. I then proceed by folding that corner over the meat and then folding the ends over. At this point, you can roll the meat and wrapping until all the wrapping has been used. Use freezer tape to seal the edges and then place the meat in the deepest part of your freezer. Whatever way you choose to freeze, the most important thing is to label and date the packaging (I learned this the hard way).
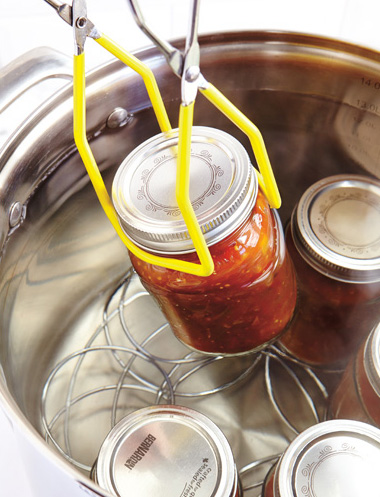
Preserving your food in a sealed, airtight container is a food preservation method called canning. Preservation with this method can last up to five years. There will be many trials and errors as you learn the proper techniques. I have had my fair share of batches go to waste due to my lack of knowledge when I first started out. I can't tell you how devastating it is when you put all your time and effort into canning something just for it to go bad on you. I would highly recommend doing your research and canning in smaller batches until you are more comfortable with this method. There are two ways to can: water bath or pressure canner. Water baths are used for high acid foods like jams, jellies, pickles, fruit, and tomatoes. When canning low acid food such as meats, stocks/broths, vegetables, or soups and stews, you will need to pressure can. This method will protect your low-acid vegetables from spoilage and botulism. Either way, it is essential to prepare your equipment, meaning sterilize and heat the jars and lids so they are safe. I am a huge fan of making a big pot of chili or vegetable soup and then canning it for dinners at a later time. It is such a time saver in the end, not to mention how much healthier it is than the store-bought versions. When canning meat, you will want to use it in soups or casseroles as it will lose some of its flavor and texture during the canning process. If you have limited freezer space, this will help you store the meat you harvested during the hunting seasons.
If you try your hand at canning, make sure to check out a couple of my favorite recipes. I have a nice size berry patch and garden, so I love making different kinds of jellies and jams. I would say my favorite so far is a recipe I found online for Pepper Jelly. You can adjust the heat on this by the number of jalapenos you add (we like it a little spicier than suggested). Whatever you chose as far as your heat limit, this jelly is good on EVERYTHING. I love it on my eggs in the morning and on my pork chops at dinner time. It is so diverse that this jelly fills up a good bit of our pantry for the year. We have no issues going through it by next season. This is a great beginner recipe because it's so simple and uses the water bath method. I will warn you though, to open your windows and consider wearing a mask. Those peppers are no joke. Check out the recipe here: The Best Pepper Jelly Recipe.
Another favorite of mine is canned beef stew. This will require a pressure canner, however, this is probably the easiest pressure canning recipe I have ever used. All you do is cut up the ingredients, toss them in the jar, and let the pressure canner do all the work. This beef stew is so tasty, that you won't want to miss out.
This Creative Homemaking recipe can be found here: How to Can Beef Stew
I love trying new recipes to change things up in the pantry. Leave me some of your favorites below!